The best stuff I own: Five all-stars from my personal gear stash

Some of the best gear I’ve ever owned is in this photo. Keep on reading…

I don’t do many gear reviews, mostly because I don’t have access to a lot of new gear. What I buy, I make it last.

But what I can offer you is something different. Call it a shout-out to the products I’ve used that have become standouts for my outdoor endeavors.

I own a multitude of tents, sleeping bags, hiking boots, running shoes, backpacks and a whole bunch of other gear for hiking, backpacking, camping and climbing. Almost all of it has performed well.

But there are a few things in my gear cache that stand out. So what I’m offering you is a roster of my all-stars. Here goes:

MSR Pocket Rocket stove, attached to an Iso-Pro fuel canister.

MSR Pocket Rocket camp stove: When the Pocket Rocket debuted, it was dubbed the lightest camp stove on the market. At just 3.5 ounces, it held that title for a long time. I bought mine 13 years ago and have used it on every overnight outing in four different states, and in all sort of conditions. It’s simple, effective and durable. Unless MSR discontinues the style of fuel cans that the Pocket Rocket uses, I can’t see replacing mine anytime soon. It’s shown virtually no wear, does its job efficiently and well, and barely makes a dent in my pack weight. You can read my review of this stove here.

I’m sporting the Columbia Omni-Wick pullover on the slopes of Mount Sherman. Nice and toasty.

Columbia Omni-Wick pullover: Another one I’ve had for a while, along with other Columbia gear. The Omni-Wick pullover has been my go-to softshell for all seasons, and in several locales. It’s warm, durable, lightweight and versatile. It’s an essential piece of gear for mountain hikes and climbs as well as for any winter activities. It kept my toasty during a marathon that was 26 degrees and windy. Enough said.

Comfortable, versatile, durable: the Merrell Moab Ventilator.

Merrell Moab Ventilator hiking shoe: I’ve been a Merrell fan for years, and this particular hiking shoe has been one of the most reliable pieces of footwear I’ve ever owned. It’s rugged enough to handle more severe terrain (think Talus-hopping above treeline, or bushwhacking in various wilderness areas) but still comfortable, warm and breathable. I might trade it out for other footwear I own given the conditions of a particular adventure, but the Moab Ventilator is my default hiking shoe for good reason.

The Salomon Sense Pro trail running shoe. Best trail runners I’ve ever owned.

Salomon Sense Pro trail running shoe: Another durable, light and high-performing piece of footwear. Unlike the other pieces of gear mentioned here (all of which were purchased), I got a pair of these through a testing program the company had going up until a couple of years ago. You can read my reviews of the Sense Pro here and here. They’re comfortable on various types of terrain, let you feel the trail and protect your feet. They’re great as lightweight hikers and drain water well. And they stay comfortable, even at long distances (I’ve run mine as far as marathon length). Of all the trail running shoes I’ve owned, these have been the best, and it’s not even close.

Me sporting the Solaris 40 backpack by The North Face. Simply put, the best piece of outdoor gear I’ve ever owned, ten years and counting.

The North Face Solaris 40 backpack: One piece of gear to rule them all. I’ve got several backpacks from a number of high-quality brands. All of them are excellent. Some are expedition-size packs, others are day packs. The Solaris 40 is in that latter category, and it might not be fair to compare it to the others. But I have my reasons for giving it the crown. I’ve owned it for 10 years. It’s been all over the world with me. It has all the features you expect in a great day pack: hydration sleeve, an ice axe loop, a lower compartment for ultralight sleeping bags, backside ventilation, and multiple pockets designed in a streamlined fashion. It’s been a reliable summit pack, day hiking pack and is the right size for hauling electronics for more urban uses. It’s also my daily use bike commute backpack. I use it almost every day, and aside from a scuff here and there, the Solaris has shown no signs of wearing out. It was the best $80 I’ve ever spent on ANY piece of gear, and defines the term “versatile.”

So there you have it. My starting five, so to speak. What has been your best gear? Let’s hear it in the comments.

Bob Doucette

Picking the right shoe for your next hike

Hmmm. Which should I wear for my next hike…

As we move closer to Memorial Day weekend, a lot of people are looking toward bigger hikes through the summer and into fall. Many of you are all-season hikers, but a good set of people lace up their hiking boots in earnest once the warm weather seasons settle in.

This is the crowd I’m talking to. And the main topic in this post is going to be about footwear.

Millions of words have been written about all kinds of gear you might need or want for hiking. I’m not exaggerating about that. But when it comes to hiking gear, it always starts with what you slip on your feet.

Plenty of stories about newbie hikers getting in trouble on the trail include references to blisters, frostbite or injured ankles due to inadequate footwear. For most people, the wrong shoe or boot can become a painful nuisance. In more extreme cases – injuries, infections or other maladies – what you wear can be the difference between a great day outside and a major crisis.

But not every trail or outing requires heavy-duty boots. And some trails require more than a light shoe.

Let’s keep this simple so things don’t get too complicated. Basically speaking, you’re looking at three types of hiking footwear: a light shoe, a light boot and a heavy-duty boot. Here’s how I’d describe them:

Light shoe: In short, these are shoes for trail running. They’re going to be light, they’ll drain water quickly, and unlike regular running shoes, their soles are going to be more rugged as they’re designed to protect a runner’s feet from protruding rocks, roots and stumps. While designed for running, they are fine for hiking and desirable for people who are trying to cut weight in what they wear on the trail.

Light boot: Meant for hiking. These will have more rugged construction in the upper and the sole than a light shoe. Though you can run in them, they’re going to be heavier than is comfortable over longer distances. Instead, light boots are made to provide comfort and protection for your feet, but will not be so bulky to weigh you down. Light boots are designed for day hikers who might do some off-trail hiking or walking on more rugged, demanding terrain than a light shoe would warrant. Many light boots are low-top in design, so ankle support would be similar to a light shoe. Some will be mid-top for more support.

Heavy-duty boot: Meant for hiking under demanding conditions, including steep slopes, uneven or loose terrain, bushwhacking and possible water crossings and snow travel. These boots will have sturdy soles and uppers. A decent boot will also have some sort of waterproofing, and many will be fitted in a way where crampons can be strapped on when needed. The best of them will be puncture resistant to things like cactus, rocks and roots. The bulk of these boots will have a mid- to high-top for more ankle stability.

What you choose to wear is going to depend on where you’re going, your goals, and even your level of hiking experience. Here are some general scenarios and then recommendations. Keep in mind, no recommendation is absolute. Here goes:

A short hike on a good trail meant that I was fine with wearing these.

Short day hike on well-maintained and easier trails: Comfort is key to enjoying a hike like this, so lighter footwear is called for. Go with the light shoe.

Day hike on hilly, more difficult terrain: In this case, performance is what matters. You’re going to need to protect your feet, keep your footing but still have enough comfort where the hike is enjoyable. The light boot is a good bet here, but a light shoe can be work if you’re confident in your hiking abilities or have a higher degree of familiarity with the route being hiked.

Exploratory hike that might include off-route bushwhacking: In this case, you’re going to be on uneven terrain with a high potential for encountering tripping elements like rocks and roots, and possibly puncture hazards like cactus, sharp rocks and broken or sharp limbs. Comfort and protection will be key, so light shoes are out. You can get away with a light boot, but a heavy-duty boot would be a better bet.

Below this summit were snow slopes. A heavier boot that could handle crampons was called for.

Mixed-terrain hiking that includes water crossings and/or snow travel: These types of hikes often include the same pitfalls as the exploratory hikes, but throw in the added problems of keeping your feet dry when encountering stream crossings, standing water or snow. The snow issue becomes more acute when the route is on a steeper slope or up a couloir, when the snow might be deeper. Postholing also becomes an issue, as you might be punching through snow and into unseen, uneven ground. In these situations, you’re going to want footwear that is waterproof, has ankle support and rugged overall construction. You can get away with wearing a light boot, but you’re better served with a heavy-duty boot that can handle the rigors of the route and keep your feet dry.

Long-haul hiking or backpacking: This could be anything from multi-day backpacking to thru-hiking. Your footwear is going to need to be engineered to protect your feet from everything listed in mixed-terrain hiking, but also must be comfortable and light enough to help you sustain extended periods of hiking while loaded with backpacking gear. The boot in question will also need to be durable enough to handle these demands over several days or weeks without breaking down. The heavy-duty boot is called upon here, but you’ll want to shop carefully to make sure that it meets all your demands while being as light as possible. If this is your game, you’ll want to research thoroughly and prepare to spend more on a high-end, heavy-duty boot. The extra money spent here will be worth every penny when you’ve been on the trail for a few weeks. Or months.

So there you have it. Any good hike always starts with what you put on your feet. Enjoy the trail!

Bob Doucette

Gear review: A second look at the Salomon Sense Pro trail running shoe

A little dustier and broken in, the Salomon Sense Pro has held up well.

A little dustier and broken in, the Salomon Sense Pro has held up well.

It’s been awhile since I first opened the box on a pair of Salomon Sense Pro trail shoes and took them out for the first time. In between now and then, I’ve put triple-digit miles on them over some pretty rough stuff ranging from my local trails to alpine routes high in the Rockies.

It was all the way back in July that I did my first review of these shoes, shortly after taking them for a spin a few times. Months later, I have a clearer verdict of how good they really are.

In review

Going back to that initial review, here were some of my thoughts:

The fit was excellent. An interior sleeve in the shoe and a secure Quicklace system helps the shoe hug your foot, though not overly so.

The tread has a solid grip. Multi-directional nugs perform a lot like cleats on an athletic field. Through dirt, hard surfaces, loose rocks and on any incline, the tread is designed to give you security and grip going uphill and down.

The low 6 mm drop is ideal for mid-foot running, and the sole’s OS Tendon provides good energy return. This, while also being light enough (8.8 ounces per shoe) to feel unencumbered on the run and good feel for the ground. I might add that there is enough support and cushion to protect your feet, but not so much to where you lose a feel for the trail.

Obviously, the initial testing of the Sense Pro went well. But did it hold up?

Somewhere just under 13,000 feet, I'm taking a break. Ran some, hiked some up here. The Sense Pro is good in the alpine.

Somewhere just under 13,000 feet, I’m taking a break. Ran some, hiked some up here. The Sense Pro is good in the alpine.

Miles later

One of the things that I liked about the Sense Mantra (the shoe I tested and owned before the Sense Pro came my way) was its durability. It put on hundreds of miles before the tread finally began to wear down. Even then, the rest of the shoe held up, and that after being taken through dust, sand, mud, dirt and snow in training runs and races.

The Sense Pro is a close cousin to the Sense Mantra, and in that area, its bloodlines show. The Sense Pro has held up extremely well, showing no real signs of wear on the tread or the upper. The only way you could tell it’s been used is how dirty they are. So the durability of the Sense Pro seems to be a strength.

I also have to go back to the two things that really make this shoe a winner: Fit and traction.

To me, these are closely linked, especially for trail running. A bad fit with good traction is a waste of money, and vice-versa. When it comes to trail running, fit is even more critical, given the variable surfaces at hand. Same deal with traction. If the shoe fits like a glove but has you slipping and skidding on steep grades, you may as well be running trails in road shoes.

There is incredible confidence when you’re running in a pair of kicks that become one with your foot and leave you feeling as if you could climb any hill or bomb down any decline, regardless of how steep, rocky or loose the surface may be. It’s made a tremendous difference in my running.

The Salomon Sense Pro trail shoe, right out of the box.

The Salomon Sense Pro trail shoe, right out of the box.

Conclusions

I’m not surprised that Salomon’s Sense Pro has performed well as the miles have ticked by. Given past results, the durability of the shoe — a hallmark of the Sense Mantra — has also shined through with the Sense Pro. Given the technical and steep terrain encountered in two states, I’d I can recommend these for any recreational or more competitive trail runner.

The Salomon Sense Pro retails for $130.

NOTE: Salomon furnished me with a pair of the Sense Pro trail shoes for testing purposes.

Gear review: A first look at the Salomon Sense Pro trail running shoe

The Salomon Sense Pro trail shoe.

The Salomon Sense Pro trail shoe.

After hundreds of miles through dirt, rocks, mud and snow, through numerous races and scores of training runs, I finally had to retire my trail runners.

Salomon had generously provided those shoes to me back then, with the idea of testing them out and letting all of you know how I felt. They performed well and lasted a long time, especially considering the abuse I put them through.

Salomon approached me again about testing their Sense Pro – an upgrade from the Sense Mantra I tested previously, and I was all too happy to oblige. Would the Sense Pro live up to the reputation of its predecessor? The final verdict has yet to be given, but some of my initial thoughts are here.

Features

The Sense Pro comes in with a sole that is 10 mm at the forefoot, and 16 mm at the heel for a 6 mm drop – still light enough to give you a feel for our running surface, but thick enough to protect your feet.

The sole’s traction system is designed to give you grip in multiple directions. This is particularly helpful on uneven surfaces, and on uphill and downhill stretches where trail-grip needs change. The nugs are not as large as you would see in a more aggressively cleated design but I can tell you from experience that you’ll be able to climb walls with the traction you get, and in a variety of conditions.

A look at the tread design on the Salomon Sense Pro.

A look at the tread design on the Salomon Sense Pro.

The Sense Pro also includes Salomon’s OS Tendon, which is geared to give you proper flex in the sole as well as energy return.

The lace-up system is also different than your typical shoe lace. The Quicklace system allows you to tighten up and stay tight, and the loose end tucks under is a small pocket on top of the tongue. I want to say that the system is improved; my prior pair was a little more stubborn, whereas with the Sense Pros, it’s been smooth and easy, yet secure when tightened. This was a minor annoyance before (and a common gripe with some runners who prefer traditional laces) that seems to be moot now.

As in prior models, Salomon also included an extra layer of material called Profeel Film built in to the sole that extends from the arch to the toes, giving you a little extra protection from rocks, roots and stumps.

The Sense Pro also has a sleeve on the interior of the shoe that hugs your foot. So no sliding around in the shoe, a concept that dovetails nicely with the security you get with the Quicklace system. Anyone who runs any sort of distance can appreciate blister-free training, which is just one benefit here.

At 8.8 ounces, it’s also lightweight, though a tiny bit heavier than the Sense Mantra (8.5 ounces).

Finally, as you would expect in any decent trail shoe, there is added, tougher material around the toe box.

Performance

I had no reason to believe the Sense Pro would not live up to the experiences I’ve had in the past, and I was correct. My initial run took me through muddy and at times watery singletrack, and with the exception of the sloppiest grades, I had no trouble keeping my footing.

On another test run – hill repeats on a steep, loose and rocky incline – I found similar security on the uphills and downhills. Truthfully, I could have probably pushed harder downhill had I not been a little banged up in my knees.

Needless to say, in dry conditions, I hugged corners, climbed hills and bounded down slopes with high confidence. My feet were comfortable and the weight of the shoe was not a burden. The fit was snug and secure, but not tight, and I had plenty of room in the toe box.

Salomon is marketing the Sense Pro as a “city trail” shoe, but on the wilder, rougher and more technical trails I run, they did just fine.

I’ll come back to these shoes for a second look when I’ve put a bunch more miles on them. If they show the same durability of my previous pair, I’ll likely be running in the Sense Pros for a long time.

The Sense Pro retails for $130.

Bob Doucette

Coming soon: Testing the Salomon Sense Pro trail shoe

The Salomon Sense Pro trail shoe.

The Salomon Sense Pro trail shoe.

I don’t do a ton of gear reviews, but the ones I do are for products that I think can be highly useful to outdoor enthusiasts and athletes. I pick the gear I review carefully, give it a hard test, then put it out there for you all to read.

I’m even more selective about the companies I work with. If I’m going to accept an invitation by a gear manufacturer to test their stuff, it’s not going to be something I take lightly.

A little over a year ago, I accepted one such invitation, from Salomon Sports. The company was looking for trail runners to put their shoes through the gauntlet. I did just that, testing and, quite literally, abusing a pair of Sense Mantra trail shoes. Heat, cold, mud, snow, rocks, you name it. A few hundred miles and several trail races later, I can still wear these shoes. Their durability and performance is something I mentioned during two rounds of reviews.

So I am excited to work with Salomon once again, this time to test their Sense Pro, a sweet looking set of kicks that looks to have all the spirit of the Sense Mantra. I’ve already given them a baptism by mud and will be testing them quite a but over the next couple of weeks. So stay tuned!

Bob Doucette

Gear review: Kahtoola Microspikes

Extra traction for the snow.

Extra traction for the snow.

It’s not often I get to test snow gear out where I live, which is a real hindrance when I want to use such things in the high country. But every now and then, I get that chance.

A couple of decent days of snow in my part of the world gave me the opportunity to whip out a pair of Kahtoola Microspikes I own, which to this day have only been used for hiking purposes. But how would they do on a trail run? That’s what I wanted to find out. But let’s tackle the basics first.

SPECS

Microspikes are one of a variety of products out there designed to give you extra traction to what you already have on your boots or shoes. There are other products, ranging from screw-in spikes that go into the bottoms of your shoes to crampons, which are used in glacier walking and steep hiking and mountaineering ventures where snow and ice are involved. Crampons can be overkill in a lot of circumstances, and deeper snow can render screw-in spikes less effective. So that’s where Microspikes and products like them come in.

The basic design is a rubber upper that slips over your boot or shoe, with steel chains on the sole. The soles also have 10 to 12 1-centimeter spikes, depending on the size you require (10 spikes for extra small, 12 for small to extra large). Each pair weighs 12 to 15-1/2 ounces, again depending on your size. I wear a 10-1/2 shoe, so I wear the large size that comes in at 14.4 ounces per pair.

Microspikes are easy to put on your shoe — the flexibility of the rubber makes it to where no straps or tightening devices are needed, provided you get the right size. Each pair comes with a two-year warranty.

So how’d they do?

An easy fit over my shoes.

An easy fit over my shoes.

HIKING

My first test came during a late spring trip into the mountains where a lot of snow was present. The snow itself was soft in spots and deep enough for kickstepping. In terms of weight, I didn’t notice much in the way be being slowed , and because of the smaller size of the spikes, it was pretty easy to transition between snow and bare rock without losing too much traction. This would not have been the case with crampons.

On that note, getting that extra traction proved helpful, particularly as the snow softened throughout the day. That doesn’t mean there weren’t any slips (there were, mostly because of the softness of the snow), but compared to a plain boot, I’d say I stuck to those slick surfaces pretty well.

Overall, the Microspikes make a decent compromise when a bare boot is not going to cut it, but crampons prove to be more steel on your foot than you really need. Experience will dictate that.

TRAIL RUNNING

Let me start off by saying that the trail shoes I use for running have proved to be more than adequate traction for running in snow, even when inclines are involved. I tested my Salomon Sense Mantras in snowy conditions last winter and noticed minimal slipping. And considering how light they are, that’s a good thing.

But I realize that some people’s shoes just aren’t ready to tackle snow. So that’s where external traction comes into play.

I put mine on and headed out for a hilly, technical 4.4-mile trail run with about 3-4 inches of fresh snow. The conditions included anything from dense powder on less-traveled trails to packed powder on places that had seen some traffic.

The run started out with a climb of about 50 feet. It was moderately steep, so this was going to be a place where slipping was bound to occur. But that did not happen. The teeth of the spikes dug in and my feet gained excellent traction throughout that little uphill.

The same could be said of the downhills. I was somewhat conservative at first, but later tried to pick up the pace on any downward slopes and had no troubles with my footing. A great sign.

But there are a couple of things I noticed. First, I did have to readjust the Microspikes on my right foot near the toe, as they’d started to shift off-center. That only happened once, but you may experience times where you have to adjust the spikes so they give you optimal traction and the chains/spikes don’t get too loose underfoot.

Second, the weight on my feet was noticeable. I didn’t get any snow balling under my shoes, but that added 7.2 ounces on each foot makes a difference. So be prepared for that.

A look at the Mirospikes from the bottom.

A look at the Mirospikes from the bottom.

OVERALL

The Kahtoola Micropikes are a durable, rugged solution for the lighter-duty traction needs of hikers and trail runners who want to tackle the snow. You may get slowed a bit if you’re a runner, and be sure to weigh your traction needs when facing steep slopes that are snowy or icy — they’re good for overall traction, but are not a substitute for crampons when crampons are what you need. But less than that, they are great to have for any number of late fall, winter and early spring adventures in the snow.

Price: $64.95 per pair suggested retail.

Note: I purchased my pair with my own funds.

Bob Doucette
Gear review: Saucony Ride 7 running shoe

I’m a creature of habit. A brand loyalist. Look at the stuff I own and have owned, and you’ll see very little variation from what I’ve bought and used in the past.

So stepping out and trying a new brand over something I’ve trusted for years is not something I do very often. I find what I like, and I stick with it.

That’s been the case for running shoes for quite some time. But every now and then, it’s worth taking a risk.

I wore out my last set of sneaks with several hundred miles of training and racing. They were done. So it came time to find replacements.

My needs: A shoe that works with mid- to forefoot-strike (which means a low heel drop), does not have a lot of motion control and has the type of comfort I need for long runs. I settled on the Saucony Ride 7.

I have little experience with this brand, but the company has a good reputation. Worth a shot, right?

The Saucony Ride 7.

The Saucony Ride 7.

Specifications

— An 8 mm drop, giving it a lower profile for those of us who are not heel strikers.

— Weighs 8.5 ounces.

— A neutral design, meaning that it’s not geared toward heavily pronating foot strikes.

— Moisture wicking fabric.

I run in heat, I don’t pronate and my forefoot strike seem to all indicate that this would be a good fit for me.

Performance

My initial impressions were good. The shoe is light and comfortable, with the right amount of cushioning for longer runs on the pavement. I’ve put on a couple of hundred miles in them since my purchase, with runs going anywhere from 2 to 13 miles, averaging between 20 and 25 miles a week.

They’ve held up fairly well, too. I would expect the kind of mileage they’re getting to result in considerable tread wear and such, but so far that has not been the case. The sole is getting a little stiffer, but they still feel good. I’ve got a couple of races coming up in the next month, and I feel good about lacing these up and letting it rip.

I’d also say that the neutral sole construction suits me well. There seems to be a bias among shoe makers to design products that favor people who pronate (such as a really high inside arch support). This causes me problems. The Ride 7’s design is meant for those of us who don’t pronate or who (gasp!) supinate. You know who you are. And if this is you, this might be your shoe.

Price

The Saucony Ride 7 retails for $120, making it a higher-end shoe, though definitely not at the top of the running shoe price range.

Overall

If I’m shelling out $120 on a pair of shoes, I better be one happy camper. I can say that I am. They’ve held up well under heavy use and remained comfortable. High-mileage runners can’t get away with going on the cheap — we have to invest in our training. And when you put it like that, gravitating toward higher-end shoes makes sense.

It’s hard to convince a guy like me to stray from brands I trust, but I’d go with the Ride 7 again when it’s time to find a replacement.

So in summary, if you’re the type who is regularly training for half marathon or marathon races (and you’re not a heavy pronator), the Ride 7 is going to be tough to beat.

Note: These shoes were not provided to me by the manufacturer.

Bob Doucette

Gear review: The Osprey Xenith 88 multi-day backpack

The Osprey Xenith 88 multi-day backpack, loaded and ready to go on a trip up to Chicago Basin, Colorado.

The Osprey Xenith 88 multi-day backpack, loaded and ready to go on a trip up to Chicago Basin, Colorado.

When it comes to gear, I like to find something I like and stick with it for as long as it will last. Good gear isn’t cheap, but it also lasts. That’s one of the reasons my gear stash is filled with durable pieces I’ve had for years.

One of the best examples is my collection of backpacks. None of them are newer than six years old.

Until now. An unfortunate incident with an airline turned my trusted expedition backpack into a tattered mess. So I needed to get a new pack that could match the performance I’ve come to rely on with the old and now ruined bag I’ve used for a decade.

I’ve heard a lot about the products made by Osprey, a manufacturer of high-end packs that gets high marks for comfort and versatility. So I gave my wallet a little exercise and plunked down the cash for Osprey’s Xenith 88.

The timing was good, as I had a backpacking trip planned a few weeks later in southwestern Colorado. This turned out to be a great way to give the Xenith a test run.

Features

My old pack was very basic. It had an adjustable internal frame, ice axe loops, an expandable  bag and not much else. I had to improvise in some things (no sleeve for a water bladder), but this was one tough, reliable piece of gear.

The Xenith is anything but bare bones. It has everything I mentioned above, and then some. A few features stuck out…

The hip belt system comes with Osprey’s heat-formed fit that you can get done in-store, or your body heat will allow the belt to fit your body over time. That same belt also comes with pockets that are ideal for things like snacks or other small items you can stow within reach without having to take the pack off and dig around inside. Big thumbs up there.

Little things abound: a whistle on the chest strap (a nice safety feature), a flexible outer pocket that’s great for things like rain gear and plenty of room on the frame to let air circulate between you and the pack – really nice for people like me who sweat a lot. The lid has two compartments instead of the single pocket most packs have. A small detail, but one that is useful if you need to separate different parts of your load at the top of the pack. And I really like the cinch tab on the drawstring at the top of the main compartment. Fewer parts (not spring-loaded like most cinch tabs) mean fewer things to break down.

I also liked how well the bottom compartment easily swallowed up my sleeping bag. The bag is a little bulky, and zipping it up in my other packs is a bit of a chore. Not so here.

Little details like this -- a hydration sleeve in between the main compartment and the frame -- are what make the Xenith stand out from more basic backpacks.

Little details like this — a hydration sleeve in between the main compartment and the frame — are what make the Xenith stand out from more basic backpacks.

But my favorite feature is the water bladder sleeve. Most packs have this inside the pack; Osprey built this outside the pack, but between the bag and the webbing on the frame. What this means: It’s still ideally placed (close to your back and in the middle of the pack, keeping that heavy load from pulling you backward), but it takes up zero space inside your bag. So the heaviest item in your pack is even closer to your back, but isn’t a factor when loading the inside of the main compartment. As a bonus: No chance of something inside your bag puncturing your water bladder. Freaking genius.

The pack is light, especially for its 88-liter capacity and overall size: Just 5 pounds, 9 ounces.

Performance

Getting to know a new piece of gear is a process. How it fits, adjusting straps and getting familiar with how its systems work takes a little time. No better way to do that than on the trail.

My load was somewhere between 35 and 40 pounds, with food, some clothes, a sleeping bag, a pad, climbing gear, a first-aid kit, a cook set, a water filter and other, smaller items.

The fit was good. The salesperson who helped me pick the pack sized me up correctly. No problems there. Even with a full load, I felt fairly well balanced during the initial seven-mile hike to camp.

Padding on the straps and the belt helped ease the load, though I did get a hot spot on my left hip on the way up, and on the opposite side going back down. Weird, yes. But I have a feeling that was at least partially due to how I loaded it. Call it half “new pack syndrome,” part user error.

Me on the go, with the Osprey Xenith 88 on my back.

Me on the go, with the Osprey Xenith 88 on my back.

One of the major problems you see with hauling packs is a difficulty in finding the right load-bearing balance between hips and shoulders. Too much on your hips and you get a lot of sway, or you get pulled back too much. Too much on the shoulders and you’ll get soreness and circulation cut-off issues, which leads to headaches. Obviously, this is an issue of proper loading and adjusting of straps. But little things – like comfort – affect how you adjust that pack to fit. It sure made it easier for me to find that right balance.

Once thing I would have liked to see: More vertical expandability. My old pack had that, making it able to increase its volume not just out, but up. The Xenith can certainly expand out, but not too far up. It’s not like it’s a great thing to have a tall pack riding on your back, but it’s nice to have that potential for extra room.

Overall

If I were to sum it up, the Xenith is a solid, versatile and surprisingly light multi-day/expedition-sized backpack. Many of its design elements are innovative. And it’s a comfortable pack. I see few drawbacks at all.

Osprey is not a discount brand, so expect to pay a little more. It retails for about $360.

In summary, if you’re looking for a new bag for your backpacking adventures, this one’s a winner.

Note: Osprey did not furnish me with this pack; it was paid for with my own funds.

Bob Doucette

Gear review: Keeping cool with the Hydro Flask

flask1

In the summer months, one of the big needs for people who are active in the outdoors is water. But a major problem is keeping that water cold.

Conversely, the icy blow of winter conditions can be softened by a hot drink.

But as we’ve all experienced, the conditions often make those cool/hot drinks rather tepid.

Enter Hydro Flask. The maker of insulated metallic water bottles promises to keep the cold nice and icy and keep the hot stuff steaming.

We’re in prime hot weather conditions right now, so this is a great time of year to put the Hydro Flask to the test.

The testing conditions: Bright, hot and humid weather on a 90-minute trail run. Starting temps were 93 degrees, and by the time I got done, they’d risen to 95.

The goal: To see how well as 12-ounce Hydro Flask would keep my ice water cold.

Observations: A metal flask is going to be heavier than plastic, but not so much as to be cumbersome. It fit perfectly in my Nathan Triangle hydration pack. Being a 12-ouncer, it was a bit small for a 90-minute workout, but no worries — they make many, many sizes to suit a lot of different needs.

flask2

How it performed: In a word, flawlessly. I sipped on my water throughout the run, trying to conserve what I had. By the time I finished, there was nothing left but ice cubes. Yes, after 90 minutes in mid-90s temperatures, the Hydro Flask kept itself cold enough inside to keep the ice cubes intact. Hydro Flask advertises that its double-wall insulated stainless steel construction can keep drinks cold for 24 hours. What I can tell you is that it was more than up to the task for my run.

The price is decent: about $20 for the 12-ounce bottle.

Some other features: It’s BPA-free and has a lifetime warranty.

In the future, I’ll test its abilities to keep hot drinks hot. But round one is a success. You can look at Hydro Flask products at hydroflask.com.

Note: The Hydro Flask was part of a box of complimentary products furnished to me by Cairn, a monthly subscription company that sends subscribers boxes of gear to try out for themselves. For more information about Cairn, go to getcairn.com or follow Cairn on Twitter @getCairn.

Bob Doucette

Gear review: Arc’teryx Traverse Perimeter hiking pants

Comfort, breathability and water resistance in your clothing are key when you're hiking to places like this. (Noel Johnson photo)

Comfort, breathability and water resistance in your clothing are key when you’re hiking to places like this. (Noel Johnson photo)

We’re in the heart of the summer hiking and backpacking season, a time when a lot of people are trying out all the new gear they could get their hands on, budget constraints notwithstanding. So any number of backpacks, trekking poles, water filters and other assorted gadgets are getting put through their paces.

But what about the gear you put on your body? The stuff you wear is as important as anything else.

I tend to skimp here, but there is high value in putting the right clothes on your body. Breathable, flexible, durable and functional clothing will keep you comfortable as you do all those sometimes uncomfortable things.

I recently got a chance to test a brand that I have eyed for some time. Arc’teryx is known as a high-end maker of outdoor clothing with a reputation for making some pretty fine stuff.

In my case, I recently bought a pair of Perimeter pants from the company’s Traverse collection. And for my test, I took these to the Rockies for a weekend of camping, hiking, mountain climbing and other outdoor fun to see just how they’d fare.

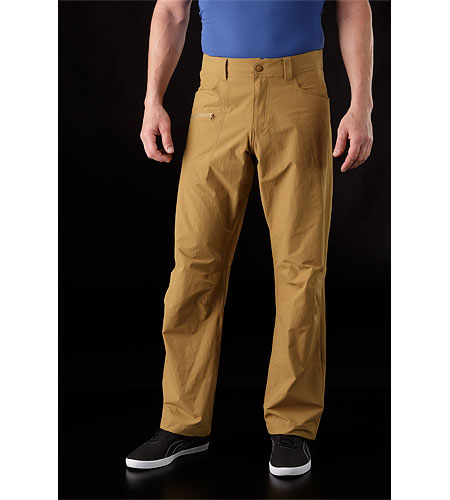
Arc'Teryx Traverse Perimeter pants. (Arc'Teryx photo)

Arc’teryx Traverse Perimeter pants. (Arc’teryx photo)

My impressions are as follows:

Fit: I’m pretty fussy when it comes to fit. Too loose and you just do too much sagging. Fine for hip-hop, terrible for hiking. To tight and you feel, well, constricted in all the wrong places, a particularly annoying problem when going up steep inclines or reaching for footholds in awkward places. I did all of that and then some.

Simply put, the Perimeters fit incredible. They never sagged (really important to keep the cuff from snagging your boot heel), but stretched when I moved. The waistline was perfect, and the inseam gave me no problems. If only all my pants fit this well.

Comfort: Breathability and resistance to water are key, and again, the Perimeters score well here. I encountered a lot of snow on different parts of this trip, so that meant I got wet. But the pants dried out quickly, and also kept my skin dry. With the hard work of going uphill for hours, I never had a problem feeling overheated in my legs.

Utility: This is a simple set of pants — it’s not overrun with pockets everywhere, and they do not convert into shorts. That fine with me. My pack can hold my stuff, and I’m more comfortable on the trail and on the rock in longer pants unless it’s warm or hot. The pockets, while snug, were roomy enough. A side zippered pocket was a good place to stow my phone, which I use as a camera when on the trail. The stretch in the fabric allows you to stuff those pockets with small items and not feel constricted.

Some hiking pants have internal or built-in cinch systems rather than belt loops; the Perimeters do not. Again, fine by me. Belts are more reliable.

Durability: The fabric is thin, but marketed as being tough enough for rock climbing. We did a good amount of that on our summit day; nothing technical, but on rugged rock just the same.

I also did a couple of glissades down some snow slopes, picking up some good speed on my seat while dropping several hundred feet in elevation on soft snow with some bumps here and there.

After the trip, I looked at problem areas for damage — knees, cuffs, and so forth. Everything looked good. But when I checked out the seat, I noticed a small tear, maybe a couple of centimeters long. I don’t know if that came from the glissade, or grinding out a tight spot on the rock higher up the mountain, but it is what it is. I’d say the pants were tough enough for hiking, but something else on the mountain proved to be too much.

Despite the snow (and not a small amount of postholing), I kept dry during my test. (Brad Lee photo)

Despite the snow (and not a small amount of postholing), I kept dry during my test. (Brady Lee photo)

Overall, I liked these pants a lot. They are a definite upgrade from other hiking pants I’ve owned, and definitely the most comfortable pants of any kind I’ve ever worn (I’d wear these to work or just walking around any time). My hope is that what I experienced with the tear was an anomaly from that trip. But if you’re looking for a good pair of hiking pants and don’t mind shelling out a little extra cash, this product is worth a look.

Price: The Arc’teryx Traverse Perimeter pants for men retails for $119.

Bob Doucette